Bronco Coil Spring Replacement?

Shadow_D

Moderator
I have never done this before but it looks simple.
Raise the front end by the frame (to take the weight off the springs), take the tires off, use a spring compression tool and start to compress. Unbolt the spring locks on the top and bottom then compress the spring enough to pull it out. Repeat the process in reverse to install.

Am I missing something or is it that simple? I know I will need to do both sides.

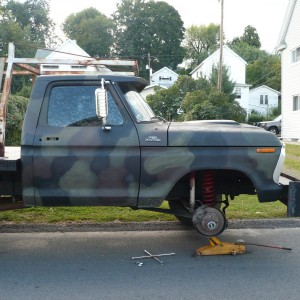
I was planning to go off-roading this weekend until I saw the passenger side spring was broken. You can see the part of the top coil hanging at the top left side near the yellow shock.
PassSpring.jpg
 
Yah that's basicly it. Actually you don't need to compress, just take the weight off so they extend to full length.

The proceedure is as follows (from the Ford shop manual)

Removal

1. Raise the vehicle and remove the shock absorber to lower bracket attaching bolt and nut.

2. Remove spring lower retainer attaching nut from inside of the spring coil.

3. Remove spring upper retainer attaching screw and remove the upper retainer.

4. Position safety stands under the frame side rails and lower the axel enough to remove the tension from the spring.

Note: the axel must be supported on the jack throughout the spring removal and installation,and must not be permitted to hang by the brake hose. If the length of the brake hose is not sufficient to provide adequate clearancefor removal and installaation of the spring, the disc brake caliper must be removed from the spindle. After removal, the caliper must be placed on the frame or otherwise supported to prevent suspending the caliper from the caliper hose. The precautions are absolutely necessary to prevent serious damage to the tube portion of the caliper hose assembly.

5. Remove the spring, lower retainer, and lower the spring from the vehicle.

Installation

1. Place the spring in position and slowly raise the front axle. insure spring is positioned correctly in the upper spring seat.

2.Position the spring lower retainer over the stud and lower seat and install attaching nut (torque to 94-134 N-m , 70 - 100 ft. lbs.).

3. position the upper retainer over the spring coiland install the attaching screws (torque to 18 - 24 N-m, 13 - 18 ft. lbs.)

4. Position the shock absorber to the lower bracket and install the attaching bolt and nut with the bolt head towards the tire. Tighten the bolt and nut to
66 - 88 N-m , 48 - 65 ft. lbs. Remove safety stands and lower the vehicle.

You might want to replace the insulator bushing between the upper and lower spring seat while you are at it.

Walla!! youre all done.

Good luck,

:)>-
 
Ok that is as simple as I thought.
Next problem I am having is do I want to just get the springs now then in a month or so get the shocks then four months or so get a 6" lift kit and have to replace all of that again. :huh:
I am thinking I should wait and save my money to get the lift.

Idea on cost hear in NY...
Springs $72.09
Shocks $50.00 ea. X 6

Almost $400.00

eBay cost for a lift kit $645.50ish

Difference $245.50

Almost makes sense to wait and get the lift.
Real question, is it safe to run normal street driving with that broken spring?
 
Dude, that looks bad!!! I definitely would not drive it, as it looks like the part of the spring that the upper tab holds onto is what's broken. The procedure is simple enough but the toughest, hardest, stubbornest part of teardown when installing a lift kit is that lower spring retainer bolt that holds the bottom of the spring. If you plan to install a lift kit, by all means now is the best time to do it. The basic 6" kit is about $500 w/ shocks. Everything will practically be undone except the axle pivot points and the PItman arm on the steering.

If you need a replacement spring to get you rolling, check the junkyards. I also have a spare set of stock coils from my 84 that you can have for shipping cost.
 
I agree with Justshootme. If the tab is broken, that spring could pop out on a hard bump leaving you up the creek without a paddle, most likely a roll over if you are moving very fast.

:)>-
 
Ok I kinda figured that was the case.
I am looking at...
Rough Country 4" lift $449.00
Upgrade to 6" $ 54.00
Quad Suspension $ 56.00
Shock Boots (other than Black) $ 12.50
Shipping $ 74.00
Total cost $645.50

Kit contains...
  • New variable rate front coil springs
  • I-beam and radius arm drop down brackets
  • new drop pitman arm to correct steering
  • 3" block and u-bolt kit for the rear
  • a heavy duty STEERING STABILIZER is included as well as mounting kit
  • four 8000 series shocks
  • 5 black shock boots
  • all necessary hardware which is zinc plated and complete instructions
Is this a good deal or can I do better? If I can do better, where?

This is why I love this board, I know some things with the Bronco but other things I don't know much about and I can always count on someone having the right answers :)>-

Thanks
 
PS

Yah that nut is a little tricky to get at. You have get a socket on it and move the ratchet along the inclined plain of the coil. That might not make much sense now, but when you get to doing it you will see what I mean.


:)>-
 
are there any springs i can get that will raise a little but not have to change any thing else??
 
cowboydan, you have the option of F-250 coil springs or the 1-1/2" leveling springs to get a bit of height up front. The F-250 springs will be much stiffer, and many folks have alignment problems with the leveling springs. In my case, when the Bronco was still stock, I got an inch or more of lift just by replacing the shocks!!!
 
Well to give you an update, I have pulled the beast out of service and ordered the Rough Country 6" lift kit. Next step is going to be to re-gear it then I will get the tires. I think I will go with the 35's. The only thing that sucks about this is I have to put the body work on hold for now -_-
I will be taking pics as I do it so everyone can see how it goes.
 
Thanks
The place I am getting the kit from says I may need the front brake lines. I have been having a small problem with my tires hitting them when turning at full lock, does this mean I am ok with them or do I need the longer ones?
 
If you're hitting them now, larger tires will most likely hit them more. So the answer is they should know what they are talking about.

:)>-
 
You do have to "lower" the axle from the frame with brackets for the axle-beam pivot points. Depending on the brand of kit, you may or may not need new brake lines. On my Skyjacker, I just relocated/rerouted the stock lines, for now. I plan to install longer, braided steel lines to eliminate any chance of popping a line.
 
I've seen some extend ridgid brake line down to the radius arm and re-use the flexable rubber brake line at the pivot point of the arm (frame end). Then run another ridgid line down the inside of the radius arm and connect to the other stock rubber line to bake calliper. Seems like a cheap way of doing it since the S.S. Brake cables are spendy. Its for street use. Off-road spend the extra bucks and get the extended S.S. lines so you don't tear them off on a rock.
 

Members online

No members online now.

Trending content

Forum statistics

Threads
4,181
Messages
19,140
Members
5,134
Latest member
Shaggy
Back
Top